Why a 5-Year-Old Water Heater Install Was Already Leaking
Top-of-the-line water heater. Five years old. Already leaking. Here's why the equipment wasn't the problem.
The call came in on a Saturday, from a short-term rental cabin in Gatlinburg. Active leak, spraying water, right above the water heater. That's not a "let's schedule you for Monday" job, especially with guests cycling through. We were on-site within the hour.
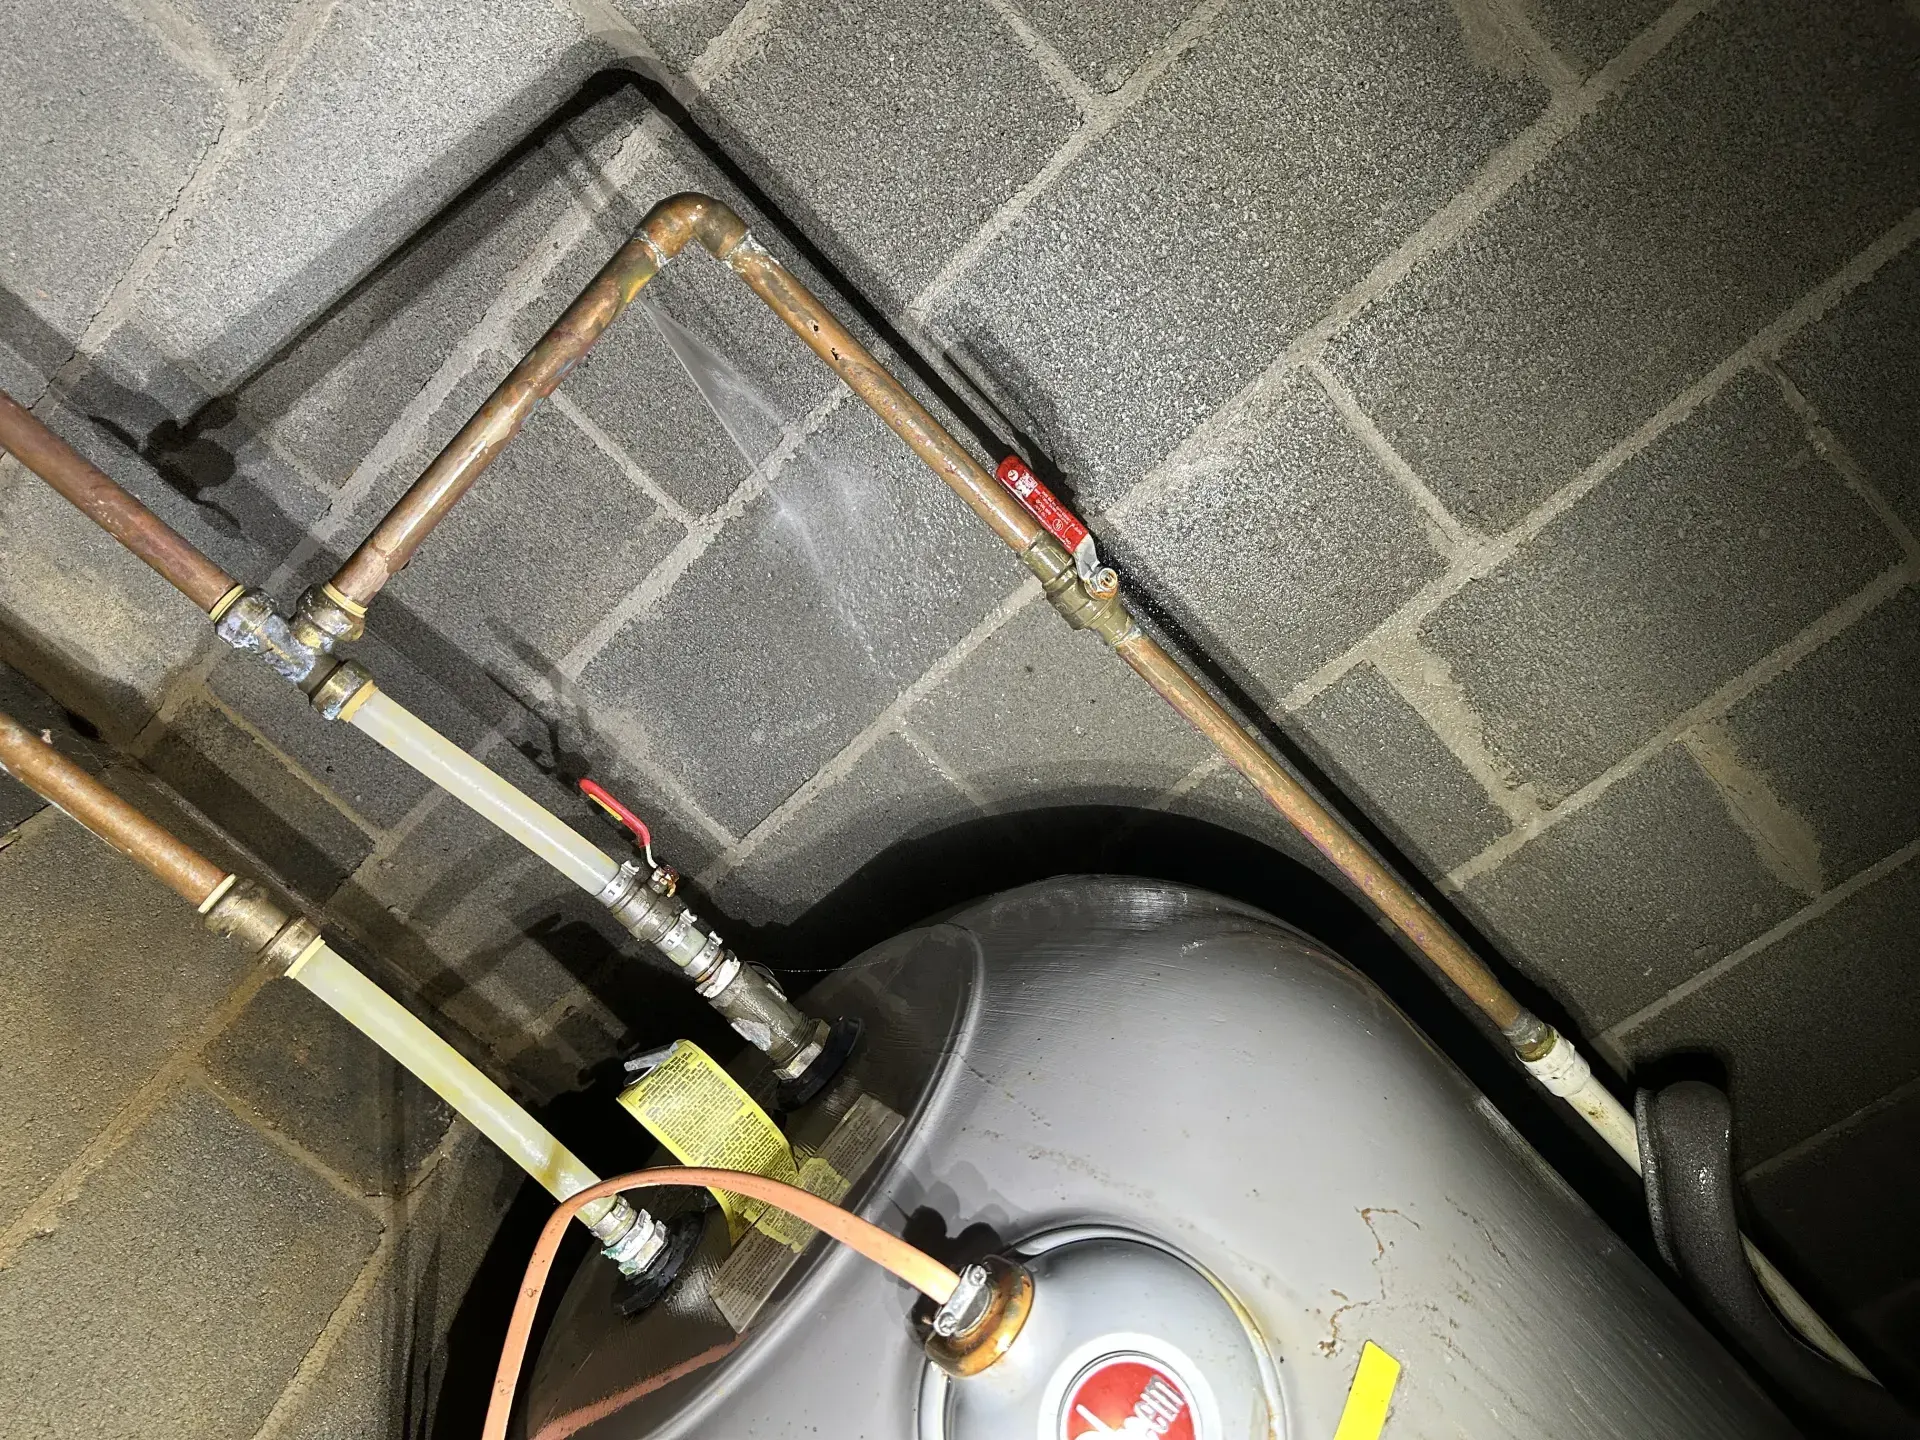
The pinhole was easy to find: a fine mist hanging in the air off a soldered copper elbow above the tank, the cinder block wall behind it already wet. What took longer to explain to the owner was everything that led up to that pinhole. It wasn't one bad piece of pipe. It was a chain of decisions going back to the day the cabin was built.
What Was Actually Installed
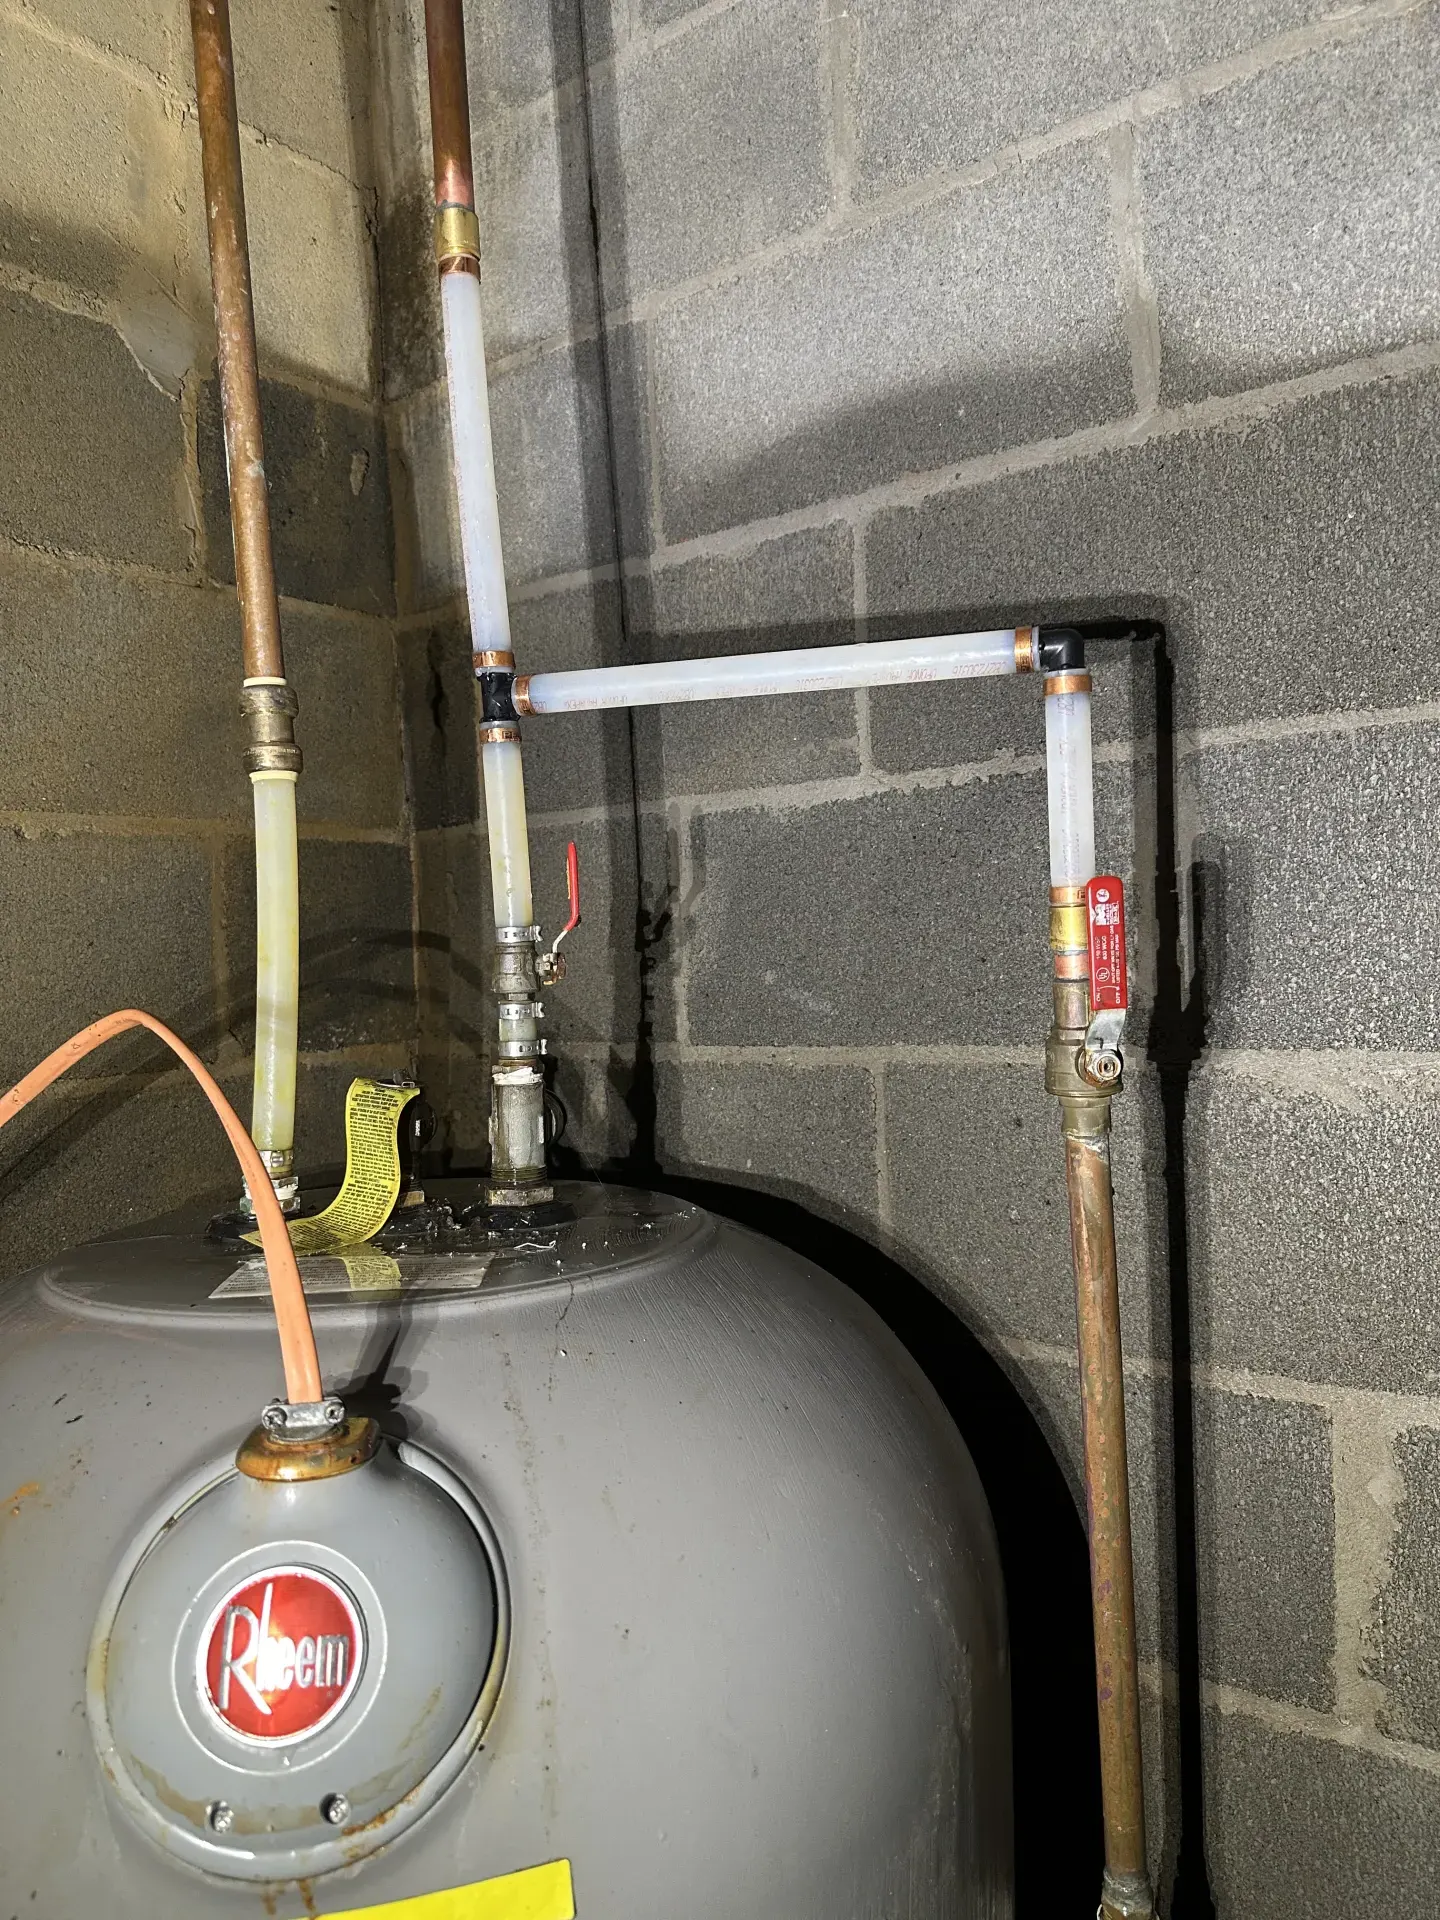
The water heater was five years old and a good one, a Rheem unit well above the builder-grade option. That detail rules out a common excuse. Handymen and DIYers replacing their own water heater tend to grab whatever's cheapest and in stock, not a top-tier unit that costs significantly more. Specifying and installing this one took someone who knew the product line. A licensed plumber did this work, someone who understood water heaters well enough to steer the customer toward the best equipment on the market, then tied it all in with the fastest fittings available.
The top of the tank tells that second half of the story. Coming off the fittings, several black-bodied push-to-connect couplers tie short runs of pipe together, stacked one after another on the hot and cold lines, all the way up to the copper stubbed out of the wall. Not one, as a stopgap on a hard-to-reach joint. Several, used as the standard connection method.
Why Push-to-Connect Ended Up Everywhere
Look past the water heater to what it was being connected to: thin-wall copper, the cost-cutting pipe used when the cabin was originally plumbed. Thin-wall copper limits your options. Crimp fittings need enough wall thickness to seat properly; crimp onto thin-wall pipe and you crush it instead of sealing it. Press fittings are manufacturer-approved for copper but still put mechanical pressure on a wall that doesn't have much to give. Push-to-connect sidesteps that: no crimping, no pressing, just push the pipe in and the internal collet grips it. Fast, code-approved, and it works on pipe other methods don't handle well. That's why it's become the default.
Permitted isn't the same as recommended. Plenty of plumbers reach for push-to-connect because it's fast. We don't. A connection relying on an internal collet, with nothing sweated, pressed, or threaded to back it up, isn't what we want holding back water pressure on a joint nobody checks again for years. If thin-wall copper won't safely take a crimp or press fitting, our answer is to change the connection method, not reach for whatever will grip the pipe without crushing it.
Separating the Product From the Install
None of this is the water heater's fault. It's a well-built unit, and whoever installed it wasn't cutting costs on equipment.
, which matters because an owner looking at a good brand name has no way to know the connections behind it were the fast option instead of the durable one.
We weren't there for the original install, so we can't say for certain why every fitting was push-to-connect instead of a mix suited to each joint. Maybe time pressure, maybe habit. What we can say is what we found: an expensive water heater, tied into old thin-wall copper, entirely through fittings chosen for speed.
How We Fixed the Leak
The pinhole repair had to account for the same problem that produced all those push-to-connect joints: thin-wall copper doesn't tolerate crimp-style connections. Our fix was to solder an adapter fitting directly onto the thin-wall copper, since soldering doesn't apply the crushing force crimp or press fittings do, then transition to a crimp fitting on the new section of pipe.
Soldering a clean joint on thin-wall copper isn't a beginner skill. It takes a steady hand, the right heat for the right amount of time, and enough repetitions to recognize a properly wetted joint before it cools. Too much heat and you damage the fitting or pipe; too little and the solder won't draw all the way around. It used to be table stakes for a plumber. It isn't anymore, now that push-to-connect and press fittings let someone skip the torch entirely, and there are fewer plumbers left who do this daily and do it well.
The Bigger Recommendation, and Where It Stood
Given what the thin-wall copper is doing here, we recommended a full repipe, not as an upsell but as a straightforward read: pipe thin enough to rule out standard fittings in one spot is thin everywhere else too, and other joints will likely fail the same way eventually. The up-front cost difference between pipe types is small compared to what an owner pays later, one Saturday leak at a time.
But repiping a whole property is a real expense, and it has to fit an owner's budget and timeline, not just our recommendation. The owner chose to fix the cold side at the water heater for now and leave the rest of the push-to-connect fittings in place. That's his call, and we respect it. You can only work within the budget and timeline you're given, especially on a property that still has to be ready for the next set of guests.
The Standard We Work To
A water heater is only as good as what's holding it to the house. When we tie a new heater into old pipe, we ask what that pipe can actually support, not just what fitting is fastest to install. That's the difference between a repair that lasts and one that just moves the next leak down the road.
Case Photos & Videos
Review the visual evidence from this project.